|
Give'em a Break
Main Startup Open Shift
Scheduler
Options & Settings
Scheduler Menu Items
Features
Tools Menu Items
Features
Reporting Menu Items
Features
Create/Remove
Job Positions
Final Break Report
Branding/Notes
Modify Break Start Times
Clone First Break
Assignments
Outgoing SMTP
Email Notification Problems
|
Home |
Give'em a Break |
Download
| Buy Now | Help |
About | Support
Main Dashboard Interface Features
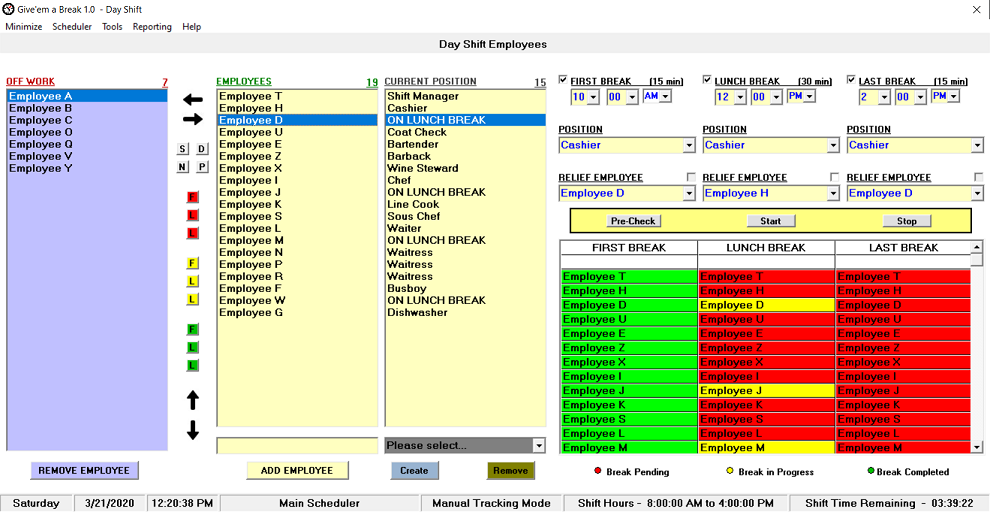
Upper Status bar
Displays the name of the currently
loaded shift and various informational messages including program usage
tips.
Lower Status bar
Displays the day, date, current
time, scheduler type (main or spawn), state of the scheduler (Manual or
Automatic Tracking Mode), shift hours and the amount of time remaining
in the shift.
Employees List
Displays the names and total
numerical amount value of all employees who are currently working the active
workday shift.
Employees List Textbox Field
Manually enter
an employee name that will be added to the shift scheduler.
Add
Employee button
Click the Add Employee button to add an
employee's name into the employee list.
Current Position List
Displays job positions assigned to corresponding employees shown in
the adjacent employees list. The total numerical amount value will
automatically update in real-time to reflect the total count of job
positions that are currently filled by working employees while other
employees are taking their scheduled breaks.
*If the Automatically Change Current Position feature is activated,
employees current job positions will automatically update in the current
positions list to reflect their First, Lunch or Last break job position
assignments.
Example: Employee F's current position is Busboy. This employee's
First Break Position assignment has been set to Dishwasher. As soon as
Employee F's First Break completes, Employee F's job position in the
current position list will automatically change from Busboy to
Dishwasher.
Please select...
Combo Box
The combo box drop down list feature displays all job positions
that have been added to the shift scheduler. The combo box provides the
option of manually assigning job positions to selected employees within
the employees list. This feature is also used to manually start or end the
First, Lunch or Last breaks for one or more employees during the workday
shift.
Create
button (Job Positions)
Click the Create button to display the Create Job Position
window. Enter a new job position into the textbox field and then click
Create. The new job position will then populate within the Job Positions
list. Click the Close button or the X (upper right corner) to close the
Create Job Position window. *Once a Job Position is created it will
automatically become available for selection in the Please select...
Combo Box drop down list.
Remove button
(Job Positions)
Click the
Remove button to display the Remove Job Position window. Click on the
desired position within the list to highlight it an then click Remove.
The job position will then be removed from the Remove Job Position list.
Click the Close button or the X (upper right corner) to close the Remove
Job Position window. *Once a Job Position is removed it will be
automatically deleted from the Please select... Combo Box drop down
list.
Off Work List
Displays the names and
total numerical amount of all employees who are currently not working
the active workday shift.
Remove Employee button
Highlight
the desired employee in the Off Work list and then click the Remove
Employee button to remove an employee's name from the shift
scheduler.
Horizontal Arrows
Click the left arrow to move
an employee from the Employees list to the Off Work list. Click the
right arrow to move an employee from the Off Work list to the Employees
list.
Vertical Arrows
Click the up arrow to move an
employee up within the Employees list. Click the down arrow to move an
employee down within the Employees list.
Sort buttons (Employees
list/Current Position list)
These various sort buttons are used to
sort the names within the employees list, current job positions, next
upcoming breaks, breaks in progress and breaks completed.
S = Set default sort. Arrange the employees within the list to your
preference and then click the S button.
D = Once the default sort is
established, click the D button at any time to sort the Employees list
based off of how it was initially displayed when the S button was
clicked.
N = Sort by employee name.
P = Sort by current
position.
F (red) = Sort by employee next first break start time.
L (red) = Sort by employee next lunch break start time.
L (red)
= Sort by employee next last break start time.
F (yellow) = Sort by
employee first break in progress.
L (yellow) = Sort by employee
lunch break in progress.
L (yellow) = Sort by employee last break in
progress.
F (green) = Sort by employee first break completed.
L
(green) = Sort by employee lunch break completed.
L (green) = Sort
by employee last break completed.
First, Lunch and Last Break
columns
Top left checkboxes next to each break column =
These checkboxes are used to activate (checkmark) or deactivate (no
checkmark) a scheduled break for one or more employees. Example #1:
Employee A is held over from the previous shift to provide coverage
because an employee is running late to work. Employee A will receive a
First Break only. Click on Employee A within the Employees list to
highlight that employee. Next, ensure that there is a checkmark for that
Employee's First Break and then remove the checkmarks from the Lunch and
Last Break columns. The main dashboard operations and the visual colored
status graph will adjust and function appropriately based off of the
break column checkbox settings for that employee. In addition, the Final
Break Report will also reflect that Employee A was scheduled to receive
the First Break only. Example #2: Employee B already received their
First and Lunch breaks. Employee B has now announced that they are
feeling sick and will be leaving work. Since Employee B will be leaving
work before they receive their Last break, you would remove the
checkmark for that employee in the Last break column. Example #3: You
have two groups of employees. Group #1 will work four hours only. Use
your mouse to select those employees within the Employees list. Next,
confirm that a checkmark is added to the First break column only. Group
#2 will work six hours. Use your mouse to select those employees within
the Employees list. Next, confirm that a checkmark is added to the First
and to the Lunch break columns only. *When a first, lunch or last break
is deactivated for an employee, that employee's break start time,
Position and Relief Employee settings will automatically become disabled and
inaccessible.
Break Start Times = The First, Lunch and
Last break columns contain the break start time for each employee
displayed in the Employees list. The break start times include the Hour,
Minute and AM/PM. Directly above the break start time is the break
duration minutes for each break column. The default value is a 15 minute
break for the First Break. A 30 minute break for the Lunch break and a
15 minute break for the Last Break. Example: Employee A's first break
start time is set at 10:00AM. Employee A's first break will end at
10:15AM. Employee B's lunch break start time is set at 12:00PM. Employee
B's lunch break will end at 12:30PM. *You can configure the shift
scheduler's Break Duration Minutes within the Options & Settings window.
Position Combo boxes = By
default, the First, Lunch and Last break Position Combo boxes will
automatically pre-fill with the employee's job position that is displayed
within the Current Position list. An employee's job position can be
changed at any time to any job position within these three break columns and is not
dependant on any column. The Positions feature is an important option
because it is very versatile depending on the needs of management. The
Positions feature concept is based off of the flow of a workday shift.
Example: At the very start of a shift, the employee starts at the job
position that is assigned to them and displayed in the Current Position
list. Once that employee completes their first break, they will work at
the job position that is assigned to them in the First break column. The
employee then takes lunch. Once their lunch break completes, they will
work at the job position that is assigned to them in the Lunch break
column. The employee then takes their last break. When the employee
returns from their last break, they will work at the job position that
is assigned to them in the Last break column and for the remainder of
their shift. If management wants an employee to work the same job
position throughout the entire workday shift, that employee's job
position would be the same identical job position that is displayed in
the Current Position list and also the Position sections in the First,
Lunch and Last break columns.
*Give'em a Break offers the ability to automatically update an
employee's job position displayed in the Current Position list with
different job positions assigned to that employee in the First, Lunch
and Last break columns. To activate this feature, navigate to
Tools/Options... on the main dashboard menu and then add checkmarks to
the desired settings located within the Automatically Change Current
Position section.
Example: The Automatically Change Current Position feature has been
activated for the First Break section. Employee K's Current Position is
Line Cook. Employee K's Position in the First Break column has been
selected to the Chef job position. Employee K starts their first break.
As soon as employee K's first break completes, their job position in the
Current Position list will automatically change from Line Cook to Chef.
Relief Employee
Combo boxes = By default, the
First, Lunch and Last break Relief Employee Combo boxes will
automatically pre-fill with the employee's name when that employee is
first added into the Employees list of the shift scheduler. If the
Employee's name displays their own name then they will relieve
themselves upon starting a break. If the Employee has been assigned a
different employee's name in the First, Lunch and Last break Relief
Employee Combo boxes then those assigned employees will provide relief
to the employee scheduled to take their break.
Example: Click on
Employee A in the Employee's list to highlight that employee. Next, within the First
Break column, click the drop down arrow in the Relief Employee section
and change the Employee A entry to Employee B. Next, within the Please select... combo box,
choose ON FIRST BREAK. Employee A's Current Position will now display ON
FIRST BREAK. Employee B's Current Position will now display Employee A's
position because Employee B is relieving Employee A for their break.
Once Employee A's First break is completed, choose END FIRST BREAK
within the Please select... combo box. Employee A's Current Position will
then revert to the job position they were assigned to before they went
on break and Employee B's Current Position will then revert to their
assigned job position before they relieved Employee A.
Relief
Employee checkboxes (Inherit) = The Relief Employee section for the
First, Lunch and Last break columns contains a checkbox for each column.
These checkboxes are used for the Inherit feature. The Inherit feature
offers the ability for relief employees to inherit job positions that
they were covering while giving a break to another employee.
Example:
Click on Employee A in the Employee's list to highlight that employee. Next, within
the First Break column, click the drop down arrow in the Relief Employee
section and select Employee B. Next, add a checkmark to the checkbox
(Inherit feature). Employee A is assigned to the Hostess position.
Employee B is assigned to the Waitress position. Employee A now goes on
first break and Employee B covers the Hostess position. Employee A's
first break is now completed and reverts to the Hostess position. Since
Employee B's Inherit setting is activated (check marked), Employee B will
inherit the Hostess position and not revert to the Waitress position. At
this point, two employees are staffing the Hostess position and the
Waitress group is less one Waitress.
*The Inherit checkbox feature will not be enabled when an employee is
scheduled to relieve them self (Self Relief).
Relief Employee E (Email)
button = The blue colored E button is located directly to the left of
the Inherit check boxes for the First, Lunch and Last break columns. The
E button provides the ability to manually and simultaneously send a
pre-notification email to one or more Relief Employees to provide a
First, Lunch or Last break to designated employees.
*The E button will
not be present on the main dashboard interface until the Outgoing SMTP
Email Settings have been setup and the Manual Tracking Mode setting is
activated (check marked) within the Send Email to Employees to start their
Relief
breaks feature of the Email Notification Options section that is located
within
the Options & Settings window.
Pre-Check, Start and Stop
buttons (Automatic Tracking Mode)
Give'em a Break offers two main
functions to manage employee breaks throughout the workday shift. They are:
Manual Tracking Mode and Automatic Tracking Mode. By default, the Manual
Tracking Mode feature is ready for use at any time when Automatic
Tracking Mode is not activated. The Pre-Check, Start and Stop buttons
are specifically designed for use of the Automatic Tracking Mode
feature. Clicking the Pre-check button invokes an algorithm which cross
checks break start time conflicts and employee relief conflicts for all
employees that are scheduled to receive a first, lunch or last break.
Once pre-check has successfully completed its analysis, Automatic
Tracking Mode is
ready for use. To start Automatic Tracking Mode, click the Start button.
To stop Automatic Tracking Mode and revert to Manual Tracking Mode,
click the Stop button.
Employees Break Status Graph (Red/Yellow and Green break
status colors)
The Employees Break Status Graph feature provides a visual real-time
status of employee breaks during the work shift. All employee names
scheduled for a first, lunch or last break will appear in the graph. The
red color state means that the employee has not yet started their break
and that their break is pending. The yellow color state means that the
employee is on their break and it is in progress. The green color state
means that the employee has finished their break and that it is
completed. If an employee has been scheduled to not receive a first,
lunch or last break, their name will not be displayed in the
corresponding break column located in the graph view.
Manual
Tracking Mode
The Manual Tracking Mode feature is used to
manually manage the start and completion of all employee breaks in the
main dashboard throughout the workday shift. Manual Tracking Mode can be used exclusively throughout
the workday shift or it can be used in unison with the Automatic
Tracking Mode feature too. Manual Tracking Mode is also designed to
manually change job positions of employees in real-time during the
shift. These features enables management to not only keep track of
employees whereabouts throughout the workday but it also ensures
seamless management of business operations while increasing the
confidence and tranquility of managing simple and complex situations
that can and do arise during a shift.
Example #1 (Self
relief): Employee A has been assigned to the Cashier job position. Click
on Employee A in the employees list to highlight that employee. Next, if
needed, add a checkmark to the checkbox at the top left in the First
Break column. Now set the break start time for Employee A to 10:00AM.
Employee A's first break Position defaults to Cashier. Employee A's
Relief Employee defaults to relieving them self (Employee A). Next,
navigate to the Please select... combo box and select ON FIRST BREAK
within the drop down list. Employee A will now start their first break.
Notice Employee A's current position no longer displays Cashier but
instead, now displays ON FIRST BREAK. In addition, Employee A's entry in
the Employees Break Status Graph section has changed from the color of red to the color
of yellow. These real-time updates indicate that Employee A's first
break is in progress. Now, end Employee A's first break by clicking on
that employee in the employees list to highlight. Next, navigate to the
Please select... combo box and select END FIRST BREAK within the drop
down list. Employee A's current position will now revert to Cashier and
Employee A's entry in the Employees Break Status Graph section has changed from the
color of yellow to the color of green. These real-time updates indicate
that Employee A's first break is now completed.
Example #2
(Relief Employee): Employee A has been assigned to the Cashier job
position. Employee B has been assigned to the Host job position. Click
on Employee A in the employees list to highlight that employee. Next, if
needed, add a checkmark to the checkbox at the top left in the First
Break column. Now set the break start time for Employee A to 10:00AM.
Employee A's first break Position defaults to Cashier. Next, within the
Relief Employee First Break column, click the drop down arrow and select
Employee B displayed in the list. Employee B is now assigned to give a
first break to Employee A. Next, navigate to the Please select...
combo box and select ON FIRST BREAK within the drop down list. Employee A
will now start their first break. Notice Employee A's current position
no longer displays Cashier but instead, now displays ON FIRST BREAK.
Also, Employee A's entry in the Employees Break Status Graph section has changed from
the color of red to the color of yellow. In addition, Employee B has now
assumed the Cashier position and is no longer staffing the Host
position. These real-time updates indicate that Employee A's first break
is in progress and Employee B is now providing coverage at the Cashier
position. Now, end Employee A's first break by clicking on that employee
in the employees list to highlight. Next, navigate to the Please
select... combo box and select END FIRST BREAK within the drop down list.
Employee A's current position of ON FIRST BREAK will now revert to
Cashier and Employee A's entry in the Employees Break Status Graph section has changed
from the color of yellow to the color of green. These real-time updates
indicate that Employee A's first break is now completed. Lastly,
Employee B is no longer at the Cashier position and has returned to
their assigned Host position.
You can start and end multiple employees breaks simultaneously by
using your mouse to highlight those employees or by holding down the
Ctrl key on the keyboard and then selecting the desired employees.
**By design, Give'em a Break does not analyze employee break start
time conflicts when starting employees First. Lunch and Last Breaks in
Manual Tracking Mode. Instead, Give'em a Break relies on the operator of
the program to properly assign break start times to employees. Give'em a
Break will analyze and notify the operator of conflicts when attempting
to start employee breaks if a Relief Employee is not available to
provide or receive a break.
Example: Employee B has been assigned to relieve Employee A when
Employee A takes their First Break. The operator places Employee A ON
FIRST BREAK. Next, the operator then attempts to start the First, Lunch
or Last Break for Employee B. Give'em a Break will automatically display
a message to the operator that Employee B cannot start their break
because Employee B is currently providing a relief break to Employee A.
Automatic Tracking Mode
The Automatic Tracking Mode feature is used to automatically manage
the start and completion of all employee breaks in the main dashboard
throughout the workday shift. Automatic Tracking Mode can be used exclusively throughout the workday
shift or it can be used in unison with the Manual Tracking Mode feature
too. Automatic Tracking Mode is also designed to automatically change
job positions of employees in real-time during the workday shift. These features
enables management to keep track of employees whereabouts throughout the
shift plus it also ensures seamless management of business operations
while increasing the confidence and tranquility of managing simple and
complex situations that can and do arise during a work shift. Automatic
Tracking Mode offers complete and full automation of all employee break
related tasks and can operate throughout an entire workday shift thus
bypassing any need for management to actively manage breaks at all.
Automatic Tracking Mode truly is the definition of the set it, forget it and rely
on it solution in any business environment today.
Example #1
(Self relief): The time is now 9:00AM. The First Break time duration is
set to 15 minutes. Employees N and P have been assigned to
the Waitress job position. Employee K has been
assigned to the Line Cook job position. These employees are
set to relieve themselves. Using your mouse, highlight these
three employees in the employee list. Next, set the First Break start time to
11:00AM. Click the Pre-check button. Give'em a Break will now commence
analyzing these employees for conflicts of break start times and relief/self
relief employees for the First, Lunch and Last Break columns
respectively. Once the Pre-check function successfully confirms that there are no
conflicts, click the Start button. Automatic Tracking Mode will now
activate. At 11:00AM, Give'em a Break will automatically start the
First Break for employees N, P and K. The current positions for these
employees will display ON FIRST BREAK. At 11:15AM, Give'em a Break will
automatically end the First Break for these employees and their current
positions will revert to their assigned job positions of Waitress and
Line Cook.
Example #2 (Relief Employee): The time is now
9:00AM. The First Break time interval is set to 15 minutes. Employee E
has been assigned to the Bartender job position. Employee Z, has been assigned to the
Barback job position. Employee Z will
provide a relief break to Employee E. Using your mouse, highlight
Employee E in the employee list. Next, set the First Break start
time to 11:00AM. Within the First Break Position section, select
Employee Z in the drop down list. Next, click the Pre-check button. Give'em a Break will now
commence analyzing these two employees for conflicts of break start
times and relief/self relief employees for the First, Lunch and Last
Break columns respectively. Once the pre-check feature confirms that there are no
conflicts, click the Start button. Automatic Tracking Mode will now be
activated. At 11:00AM, Give'em a Break will automatically start the
First Break for employee E and simultaneously change Employee Z's job
position from Barback to Bartender. At 11:15AM, Give'em a Break will
automatically end the First Break for Employee E. Employee E's job
position will then display Bartender again and Employee Z's job position
will revert back to the Barback Job position.

Home |
Give'em a Break |
Download
| Buy Now | Help |
About | Support |
Add Employee button
Arrows (Horizontal)
Arrows (Vertical)
Automatic Tracking Mode
Break Start Times
Current Position
list
Employees Break Status
Graph
Employees List
Employees
List Textbox Field
First,
Lunch & Last Break Columns
Job Positions (Create
button)
Job Positions (Remove
button)
Job Positions
(Employee)
Manual Tracking Mode
Off Work list
Please
Select... Combo box
Pre-check, Start & Stop Buttons
Relief
Employee E (Email) Button
Relief Employee
(Combo Box)
Relief
Employee (Check box - inherit)
Remove Employee
Button
Sort
Buttons
Status Bar (Upper)
Status Bar (Lower)
|
