|
Main Startup Open Shift Scheduler Final Break Report Branding/Notes Outgoing SMTP Email Notification Problems
|
Home | Give'em a Break | Download | Buy Now | Help | About | Support
Options & Settings Features
The settings in this section are specifically designed for configuration of the shift scheduler to operate and function based on how a business model is setup for allocating employee breaks during the workday shift. Select the start time and end time of the workday shift. These hours are displayed on the lower status bar on the main dashboard interface. This Shift Hours feature also provides additional settings which correlate to the start and end of a workday shift. When the start time lapses above... Activate (Checkbox) = When check marked, the settings in this sub-section will automatically commence when the Start Time occurs. When not check marked, the settings in this sub-section will not automatically commence when the Start Time occurs. Display prompt to manually reset scheduler = This setting will automatically display a Yes/No prompt on the main dashboard interface to manually reset the shift scheduler in preparation for the start of the workday shift. If you select Yes, any employee breaks that are in progress will automatically revert back to their current position and their associated Employee Break Status Graph entry will change from Yellow back to the color of Red. In addition, if the employee was relieved for break by a different employee, that relief employee's current job position will revert back to their own assigned job position. All shift logs will be cleared too. If you select No, no changes to the main dashboard of the shift scheduler will occur. *During the reset of the shift scheduler, Give'em a Break will also clear the contents in the Notes section which is located in the Final Break Report Branding window. Automatically Start Automatic Tracking Mode = This setting will automatically start the Automatic Tracking Mode feature when the Start Time occurs. In order for this feature to activate, the Pre-Check feature located on the main dashboard must be manually completed before the start time of the workday shift. This requirement is needed to ensure that no employee break start time conflicts exist when Automatic Tracking Mode is automatically started. Restore Template before automatically starting (Checkbox) = When activated (check marked), this sub-setting of the Automatically Start Automatic Tracking Mode feature will automatically shutdown Give'em a Break, restore the most recently saved shift scheduler template and restart Give'em a Break. Momentarily thereafter, the Automatically Start Automatic Tracking Mode feature will then commence. When not check marked, Give'em a Break will not restore the saved shift scheduler template or restart. When the end time lapses above... Automatically Stop Automatic Tracking Mode = When activated, this setting will automatically stop Automatic Tracking Mode when the End Time occurs. When not activated, this setting will not automatically stop Automatic Tracking Mode when the End Time occurs. *If you do not activate (checkmark) this feature, Automatic Tracking Mode will continue to operate indefinitely. This means that Automatic Tracking Mode will automatically start (plus send employee email notifications if activated) and end all scheduled employee breaks the following day and everyday thereafter until Automatic Tracking Mode is manually stopped or the computer is rebooted. Depending on your business model, this outcome may be desirable or it may not be what you want to occur especially if you want to maintain in-person main dashboard control over break time events. Select the end time of the shift scheduler. The end time should occur before the actual end time of the workday shift that was set in the Shift Hours feature. This End Time for Shift Scheduler feature is designed to automatically archive (generate/save) and/or email the Final Break Report after all employee breaks have completed and before the workday shift is over. Example: The shift ends at 4:00pm. The last employee break completed at 2:30pm. The Final Break Report will be automatically archived and/or emailed at 3:50pm (as shown above) which is after all breaks have completed and before the shift is over for the workday. This feature is designed to bypass the need to always have to remember to manually archive or email the Final Break Report. Activate (Checkbox) = When check marked, various pre-assigned audible sounds will occur when certain operational events transpire during the workday shift. When not check marked, no audible sounds will be heard. The Break Duration Minutes feature is designed to designate the amount of time duration allocated to employees for their First, Lunch and Last breaks during the workday shift. By default, the time duration is 15 minutes for the First Break. 30 minutes for the Lunch Break and 15 minutes for the Last Break. These break time durations are displayed at the top of the First, Lunch and Last Break columns located on the main dashboard interface. -Automatically Change Current Position The Automatically Change Current Position feature is a highly versatile and dynamic function which provides operators the option of automatically changing employees job positions after they have completed their First, Lunch or Last break during the workday shift. Example: 1. Within the Automatically Change Current Position feature section, add a checkmark to the After the First Break completes setting. 2. On the main dashboard interface, click on Employee A in the employees list to highlight Employee A. 3. Click the Please Select... combo box to expand the drop down list. 4. Select (assign) the Cashier job position to Employee A. Employee A will now start the workday shift at the Cashier job position. 5. Next, within the First Break Column section, click the Position combo box to expand the drop down list and select the Host job position. 6. Click the Please Select... combo box to expand the drop down list and select the ON FIRST BREAK entry. Employee A will now start their First Break. 7. When Employee A's First Break has completed (15 minutes has passed), click the Please Select... combo box to expand the drop down list and select the END FIRST BREAK entry. *For this example, you don't have to wait 15 minutes to experience how this feature functions. Go ahead and immediately end the first break for this employee. Employee A's current position will now display the Host job position instead of the Cashier job position. As you can vision, this feature gives the operator the ability to assign different job positions (duties) to any employee at different times throughout the workday shift. This feature is very helpful when training employees at different job positions, providing necessary coverage at certain positions when the demand is high at those positions, filling in/sharing a position based on the amount of employees that are working the shift. In addition, this feature keeps track of all employee whereabouts throughout the shift thus injecting tranquility and total control of employee break operations within your business. This feature is available for use during Manual Tracking Mode and Automatic Tracking Mode operations. -Manually Change All Positions Simultaneously When check marked, this feature will automatically change an employee's First, Lunch and Last Break job positions to mirror the employee's job position displayed in the current position list. When not check marked, this feature will not automatically change an employee's First, Lunch and Last Break job positions to mirror the employee's job position displayed in the current position list. Example: 1. Add a checkmark to the Manually Change All Positions Simultaneously feature. 2. On the main dashboard interface, click on Employee A in the employees list to highlight Employee A. 3. Click the Please Select... combo box to expand the drop down list. 4. Select (assign) the Waiter job position to Employee A. The Waiter job position will simultaneously become assigned to the employee's Current Position and the First, Lunch & Last Break column positions too. This feature bypasses the cumbersome steps of having to manually assign the same job positions multiple times for one or multiple employees in preparation of the workday shift. -Pre-notify Start or End of Scheduled Breaks When check marked, this feature will automatically notify the operator that one or more employees are scheduled to start or end their First, Lunch and Last Breaks. This feature will display the name of the employee in the upper status bar on the main dashboard interface and also invoke an audible chime if the Sound Setting feature is activated. If the Automatic Tracking Mode feature is activated, the employee's name will automatically highlight in the Employees list. If the Manual Tracking Mode feature is activated, the employee's name will not automatically highlight in the Employees list. When not check marked, this feature will not automatically notify the operator that one or more employees are scheduled to start or end their First, Lunch and Last Breaks. -Display Next Break Start Time Activate (Checkbox) = When check marked, the next break start time for employees First, Lunch & Last Breaks will be displayed in hours/minutes on the lower status bar located on the main dashboard interface. When not check marked, the next break start time for employees will not display on the lower status bar located on the main dashboard interface. Example: The current time is 11:50am. Employee A's Lunch Break is scheduled for 12:00pm. Employee B's Lunch Break is scheduled for 12:05pm. The Next Break Start Time will display 10 minutes because Employee A's next break is in 10 minutes whereas Employee B's next break is in 15 minutes. -Require Pre-Check Before Saving Scheduler Activate (Checkbox) = When check marked, this feature reminds the operator to use the Pre-Check feature in preparation for the Automatic Tracking Mode feature or the Automatically Start Automatic Tracking Mode feature. This feature also ensures that there are no employee break start time conflicts when Saving or Restoring a scheduler template. When not check marked, the operator will not be reminded to use the Pre-Check feature. -Automatically Backup All Shift Schedulers Activate (Checkbox) = When check marked, this feature will automatically backup Give'em a Break's entire database which includes all shift schedulers each time Give'em a Break is started up. Give'em a Break will maintain a maximum of 30 backups. The backup filename will include the date and time of when the backup was created. When not check marked, this feature will not automatically backup Give'em a Break's entire database which includes all shift schedulers each time Give'em a Break is started up. You can view and restore backups at any time by navigating to the Scheduler/Restore All Shift Schedulers menu located on the main dashboard interface. Outgoing SMTP Email Settings -To: (email address) checkbox Add a checkmark to this feature to receive a BCC (Blind Carbon Copy) email when any type
of email is sent to Employees or Management. Do not add checkmark to this setting to not
receive a BCC email when any type of email is sent to Employees or
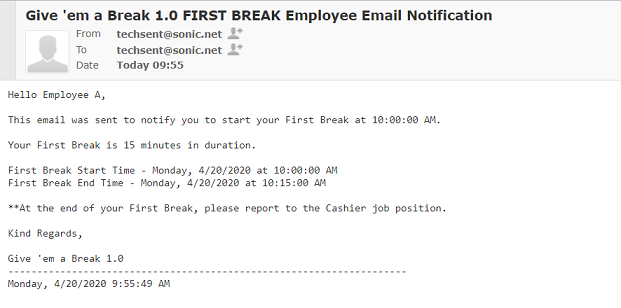
Management. The Email Notification Options feature provides three different types of emails that can be sent to employees. *To send an email to an employee, enter their email address in their designated Email Address column located in the Employees Work Schedule worksheet. Navigate to the Reporting/Employees Work Schedule menu item located on the main dashboard interface. -Send Emails to employees to start their breaks When any employee starts their First, Lunch or Last Break they will receive an email notification informing them to start their break. Here is an example visual representation of an email that will be sent to Employee A.
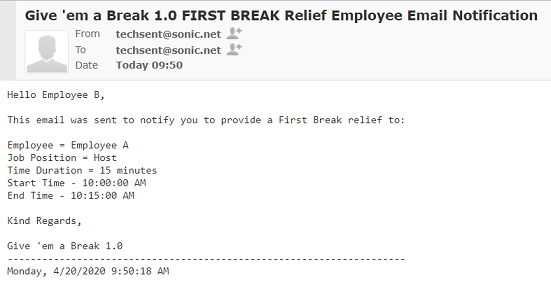
As you can see, the email sent to Employee A gives clear and concise break time direction and information. *Since this employee has been scheduled to fill the Cashier position after their Lunch Break completes, the email provides direction for them to do so. Automatic Tracking Mode = Give'em a Break will automatically send an email notification when any employee automatically starts their First, Lunch or Last Break. Manual Tracking Mode = An email notification will be automatically sent to the employee when you manually start the employee's First, Lunch or Last Break. -Send Emails to employees to start their relief breaks A relief break is a Relief Employee (Employee B) who is assigned to relieve a different employee (Employee A) and temporarily fill that employee's (Employee A) job position while Employee A is taking their scheduled break. Here is an example visual representation of an email that will be sent to Relief Employee B.
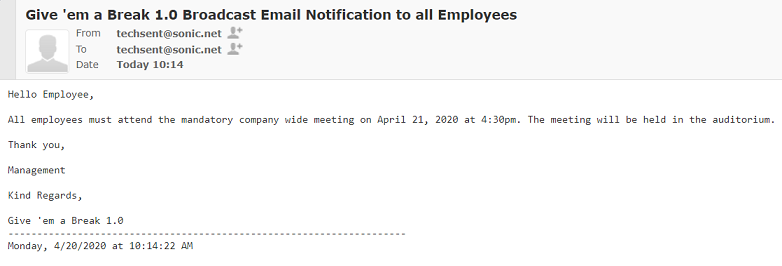
Automatic Tracking Mode = Give'em a Break will automatically send an email notification to the Relief Employee before the Employee automatically starts their First, Lunch or Last Break. *You can pre-notify the Relief Employee to provide the relief break 5, 10 or 15 minutes prior to the start of the Employee's break. Manual Tracking Mode = At any time prior to the start of the Employee's break, you can manually send an email to the Relief Employee to provide a relief break to the Employee by clicking the blue colored button labeled E (Email). Once you activate this Manual Tracking Mode feature, the E button will appear on the main dashboard interface within the Relief Employee section. To schedule a relief break for Employee A and manually send an email to that employee's Relief Employee (Employee B), complete these exampled steps: 1. On the main dashboard interface, click on Employee A in the Employees list to highlight that employee. 2. Within the First Break column, set the First Break start time for Employee A. 3. Within the First Break column, Click the combo box drop down arrow in the Relief Employee section and select Employee B. 4. Prior to the start time of Employee A's First Break, highlight Employee A and then click the button labeled E. Give'em a Break will send the relief break email to Employee B prompting Employee B to provide a relief break to Employee A. Pound # Keyboard Character = Give'em a Break provides the option of not sending any type of email to one or more employees and management by adding the # sign in front of their email address. The Send Broadcast Email feature provides the option to send a broadcast email to all employees and management simultaneously. This feature can be used for a multitude of events. Example events include: An emergency situation (Fire, earthquake etc..), directing employees to work overtime, directing employees to attend a company wide meeting etc...Any information entered into the message textbox field will be emailed. The email will be sent to every employee email address that is listed in the Work Schedule worksheet. The email will be sent to every management email address that is listed in the Branding/Notes feature. Here is an example visual representation of an email that will be sent to all employees and management.
*Give'em a Break provides the option of not sending an email to one or more employees and management by adding the # sign in front of their email address. Since the Send Broadcast Email feature is designed to be a valuable tool to communicate important information to all employees and management simultaneously, the # sign will be ignored and the email will be sent to those applicable employees and managers too.
Home | Give'em a Break | Download | Buy Now | Help | About | Support |
Automatically Backup All Shift Schedulers Automatically Change Current Position Manually Change All Positions Simultaneously Pre-notify Start/End of Scheduled Breaks Require Pre-Check Before Saving Template Send Email to Employees to Start their Breaks Send Email to Employees to Start their Relief Breaks
|