|
Main Startup Open Shift Scheduler Final Break Report Branding/Notes Outgoing SMTP Email Notification Problems
|
Home | Give'em a Break | Download | Buy Now | Help | About | Support
Main Dashboard Operation Exercises
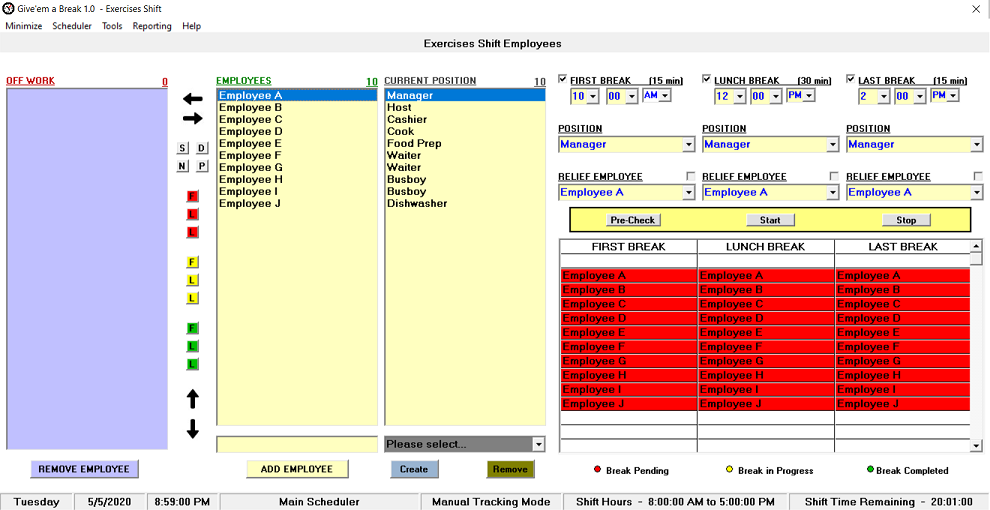
Give'em a Break's main dashboard interface is specifically designed to manually and/or automatically manage employee breaks throughout the workday shift. The dashboard contains many operational dynamic, intuitive, nonrestrictive and flexible features which were purposely created to assist managers, supervisors, shift leaders and operators in break management operations. Please complete these real-time exercises below to become familiar, confident and comfortable with Give'em a Break main dashboard operations. Exercise 1 - Create a custom shift scheduler. Add employee names and job positions to the new custom shift scheduler. Startup Give'em a Break software. Open the Day Shift Scheduler. Navigate to Scheduler on the menu and select New Custom Shift. Name the new custom shift Exercises and then click OK. The Day Shift scheduler will automatically close and the new Exercises custom shift scheduler will startup and display on the screen. Next, enter the employee name of Employee A into the textbox field that is located below the Employees list and then click the Add Employee button. Employee A will populate in the Employees list. Add nine more additional employees into the list. Example: Employee B, Employee C etc... Click the Create button to create and add job positions to the custom shift scheduler. Example: Your business is a restaurant. Within the textbox field, enter the job position of Cashier and then click the Create button. The Cashier job position will populate into the Job Position list. Create and add these additional job positions: Cook, Food Prep, Waiter, Busboy, Dishwasher, Host and Manager. At this stage, employee names and job positions have been added to the Exercise 1 custom shift scheduler. The next step is to assign job positions to these ten employees. Click on Employee A in the Employees list to highlight that employee. Next, click the Please Select... combo box and select the Manager job position within the drop down list. The Current Position list will now display the Manager job position and that position is associated to Employee A displayed in the Employees list. *By default, when you assign a job position to an employee for the first time. the job position will be automatically assigned to the Employee's Position combo boxes located in the First, Lunch and Last Break columns. Assign the remaining job positions as shown below.
Employee B - Host Exercise 2 - Manual Tracking Mode Operations
Now sort the employees in the Employees list by name by clicking on the sort button labeled N. Now sort the employees in the Employees list by job position by clicking on the sort button labeled P. Click N again. Using your mouse, highlight all employees in the Employees list and assign their First Break start time to 10:00AM. Lunch Break start time to 12:00PM. Last Break start time to 2:00PM. Select Tools on the menu then Save Scheduler as Template. You can restore these employee assignments as shown at any time. Click the Please Select... combo box and select ON FIRST BREAK. All employees will now start their First Break. Highlight all employees and remove and then add the check mark at the top of the First Break column. All employees First Breaks are now reset. Click the Please Select... combo box and select ON FIRST BREAK. All employees will now start their First Break again. Select Reporting on the menu then Employees Work Status. Close the Employees Work Status window. Click the Please Select... combo box and select END FIRST BREAK. All employees will now end their First Break. Perform the same actions for the employees Lunch Break and Last Break. All employee breaks have now completed. Select Reporting on the menu then Manual Mode Shift Log. Select Reporting on the menu then Generate Final Break Report. Select Tools on the menu then Reset Scheduler for New Shift. Highlight all employees and change their First Break Position to Cashier. Clicking on individual employees show that they have all been assigned to the Cashier job position. Highlight all employees and change their First Break Relief Employee to Employee A. Clicking on individual employees show that Employee A has been assigned as Relief Employee for all employees. Click the Please Select... combo box and select the Cook job position. All employees are now assigned to that position. Highlight all employees and remove the check mark at the top of the First Break column. Now, no employees are scheduled for a First Break. Click on Employee A to highlight then click the left arrow to move the employee to the Off Work list. Select Tools on the menu then Restore Scheduler Template. All employees original start of shift assignments have been conveniently restored and ready for next workday shift operations. Exercise 3 - Automatic Tracking Mode Operations
Activate the main dashboard interface into Preparation Mode by navigating to Scheduler on the menu/Preparation Mode and then click Activate. Give'em a Break will automatically shutdown, modify the Break Duration Minutes of all employees to the 1 minute value for the First Break, Lunch Break and Last Break columns and then start back up. Navigate to Tools on the menu then Options... and activate the Sound Setting. Close the Options and Settings window. Click on Employee B in the Employees list to highlight that employee. Change the First Break start time for Employee B to 3 minutes past the current time on your computer. Example the current time is 10:00AM. Set the First Break start time for Employee B to 10:03AM. Click the Pre-Check button to analyze break start times and relief employee conflicts for all employees displayed in the Employees list. Advance through and complete the Pre-checking analysis requirement. Click the Start button to start Automatic Tracking Mode. At 10:03AM, Give'em a Break will automatically start the First Break for Employee B. At 10:04AM, Give'em a Break will automatically end the First Break for Employee B and return that employee to their Host job position. *The start and end of the first break occurred in 1 minute because Give'em a Break is currently in Preparation Mode. Click the Stop button to stop Automatic Tracking Mode and revert to Manual Tracking Mode. ____________________________________________________________________________________________________ Click on Employee B in the Employees list to highlight that employee. Change the First Break start time for Employee B to 3 minutes past the current time on your computer. Example the current time is 10:07AM. Set the First Break start time for Employee B to 10:10AM. Change the First Break Relief Employee from Employee B to Employee C. Now click on Employee C and set the First Break start time for Employee C from 10:10AM to 10:12AM (this step is necessary because Employee C will provide a relief break to Employee B and these two employees cannot take their breaks at the same start time). Advance through and complete the Pre-checking analysis requirement. Click the Start button to start Automatic Tracking Mode. At 10:10AM, Give'em a Break will automatically start the First Break. Employee C will leave their Cashier job position and relieve Employee B at the Host job position while Employee B takes their First Break. At 10:11AM, Give'em a Break will automatically end the First Break for Employee B and return Employee B to their Host job position while Employee C returns to their Cashier job position. Click the Stop button to stop Automatic Tracking Mode and revert to Manual Tracking Mode. ____________________________________________________________________________________________________ Hold down the Ctrl key and click on Employees E, F and H in the Employees list to highlight only those employees. Change the First Break start time for Employees E, F and H to 3 minutes past the current time on your computer. Example the current time is 10:15AM. Set the First Break start time for Employees E, F and H to 10:18AM. Advance through and complete the Pre-checking analysis requirement. Click the Start button to start Automatic Tracking Mode. At 10:18AM, Give'em a Break will automatically start the First Break. Employees E, F and H will leave their assigned job positions and take their First Break. Double click on Employees E to view the break time remaining for that employee. Click the Yellow sort button labeled F. Click the Red sort button labeled F. Click the Grey sort button labeled P. Click the Grey sort button labeled N. At 10:19AM, Give'em a Break will automatically end the First Break for Employees E, F and H and return those employees to their job positions. Click the Green sort button labeled F. Click the Red sort button labeled F. Click the Stop button to stop Automatic Tracking Mode and revert to Manual Tracking Mode. ____________________________________________________________________________________________________ Use the mouse to only highlight Employees F and G in the Employees list. Change the First Break start time for Employees F and G to 3 minutes past the current time on your computer. Example the current time is 10:22AM. Set the First Break start time for Employees F and G to 10:25AM. Change the First Break Relief Employee to Employee B. Click the Pre-Check button to analyze break start times and relief employee conflicts. A message will display notifying you that Employee B cannot relieve Employees F and G at the same break start time because employees cannot relieve more than one employee at the same time. Highlight Employee G only and set the First Break start time to 10:27AM. Advance through and complete the Pre-checking analysis requirement. Click the Start button to start Automatic Tracking Mode. At 10:25AM, Give'em a Break will automatically start the First Break. Employee B will leave their Host job position and relieve Employee F at the Waiter job position while Employee F takes their First Break. At 10:26AM, Give'em a Break will automatically end the First Break for Employee F and return Employee F to their Waiter job position while Employee B returns to their Host job position. At 10:27AM, Give'em a Break will automatically start the First Break. Employee B will leave their Host job position and relieve Employee G at the Waiter job position while Employee G takes their First Break. At 10:26AM, Give'em a Break will automatically end the First Break for Employee G and return Employee G to their Waiter job position while Employee B returns to their Host job position. Click the Stop button to stop Automatic Tracking Mode and revert to Manual Tracking Mode. Select Tools on the menu then Restore Scheduler Template. All employees original start of shift assignments have been conveniently restored and ready for next workday shift operations. ____________________________________________________________________________________________________ In this exercise we'll configure Give'em a Break to provide all employees a First, Lunch and Last Break in Preparation Mode while also ensuring proper job position coverage throughout the entire workday shift. During this exercise, we'll also deactivate Preparation Mode and return to normal mode operations. Click on Employee A in the Employees list to highlight that employee. Change the First Break start time for Employee A to 15 minutes past the current time on your computer. Example the current time is 10:00AM. Set the First Break start time for Employee A to 10:15AM. Change the First Break start time for Employee B to 10:10AM and change the Relief Employee to Employee A. Change the First Break start time for Employee C to 10:12AM and change the Relief Employee to Employee A. Change the First Break start time for Employee D to 10:10AM and change the Relief Employee to Employee E. Change the First Break start time for Employee E to 10:12AM and change the Relief Employee to Employee D. Change the First Break start time for Employee F to 10:10AM. Change the First Break start time for Employee G to 10:12AM. Change the First Break start time for Employee H to 10:10AM. Change the First Break start time for Employee I to 10:12AM. Change the First Break start time for Employee J to 10:14AM and change the Relief Employee to Employee I. Navigate to Tools on the menu then Clone Employee Assignments. Select the Start Time, Position and Relief Employee assignments. Select all employees in the Employees list. Click the Now button to clone all employees First Break assignments to their Lunch and Last Break columns. Navigate to Tools on the menu then Modify Break Start Times. Select Lunch Break in the Break Section. Select all employees in the Employees list. Select 7 in the Minutes section. Click the Advance button to advance all employees Lunch Break's by 7 minutes. *The Lunch Break Start Times for all employees were advanced by 7 minutes because those 7 minutes are the minimum amount of minutes needed to avoid break start time conflicts with certain employees First Break and Lunch Break Start Times. Example: Employee A is the Relief Employee for Employee B. Employee B's First Break Start Time is 10:10AM. Employee A's First Break Start Time is 10:15AM. Since Employee A is the Relief Employee for Employee B during the First Break and Lunch Break, the minimum amount of minutes needed to avoid break start time conflicts for these to employees is 7 minutes because Employee B cannot start their Lunch Break while Employee A is still taking their First Break. This scenario will not occur regularly during normal mode break time operations because the First, Lunch and Last Break Start Times for all employees will usually occurs hours apart from each other. Navigate to Tools on the menu then Modify Break Start Times. Select Last Break in the Break Section. Select all employees in the Employees list. Select 14 in the Minutes section. Click the Advance button to advance all employees Last Break's by 14 minutes. Click the Pre-Check button to advance through and complete the Pre-checking analysis requirement. Select Tools on the menu then Save Scheduler as Template. Click the Start button to start Automatic Tracking Mode. Give'em a Break will automatically Start/End all employee breaks on the main dashboard interface. Click the Red sort button labeled F. Click the Grey sort button labeled P. Click the Grey sort button labeled N. While employees are taking or not taking any break, navigate to Reporting on the menu then Employee Work Status. View and sort the details in the worksheet. Close the Employee Work Status worksheet window to return to the main dashboard interface. After all employee breaks have completed, click the Stop button to stop Automatic Tracking Mode and revert to Manual Tracking Mode. Upon completion of all test breaks, select Tools on the menu then Restore Scheduler Template. At this stage all employee break assignments except for the Break Start Times are correctly configured and ready for real-time operations. Navigate to Scheduler on the menu/Preparation Mode and then click Deactivate. The Break Duration Minutes for the First Break, Lunch Break and Last Break columns automatically change from the 1 minute value back to their original minute values of 15, 30 and 15 minutes respectively. Select all employees in the Employees list. Change the employees First Break Hour and AM/PM values to correspond with their scheduled First Break Start Time. Change the employees Lunch Break Hour and AM/PM values to correspond with their scheduled Lunch Break Start Time. Change the employees Last Break Hour and AM/PM values to correspond with their scheduled Last Break Start Time. Select Tools on the menu then Save Scheduler as Template. Select Scheduler on the menu then Backup all Shift Schedulers. Click the Start button to start Automatic Tracking Mode and initiate Full Automation in normal mode of all employees breaks throughout the entire workday shift.
Home | Give'em a Break | Download | Buy Now | Help | About | Support |